
Table of Contents
Quick answer: To fax from an iPhone, open a fax app, add or scan your document, type in the recipient’s fax number and tap send — it takes about two minutes. There’s no fax feature built into the iPhone itself, so you’re always using a fax app or a fax website to do it. Below is the full walkthrough, screen by screen — plus how to do it without installing anything, how to scan a paper page first, and what it costs.
Faxing from an iPhone sounds fiddlier than it is. Once you’ve got a fax app installed, the whole thing — scan or attach, address it, send — is quicker than tracking down a fax machine ever was, and you get a delivery receipt at the end that a machine never gave you.
We’ll use a fax app for this guide, since it’s the smoothest route if you fax more than once. Prefer not to install anything? Skip to faxing without an app. Not sure which app to pick? Our tested rankings are in the best iPhone fax apps review.
There’s not much to set up: an iPhone with a working internet connection, the document you want to send (a PDF, a Word file, a photo, or a paper page you’ll scan), and the recipient’s fax number with its area code. No phone line, no fax modem, no cables.
Prefer to watch? Here’s the whole thing in under two minutes — then scroll on for the step-by-step.
How to Fax From an iPhone, Step by Step
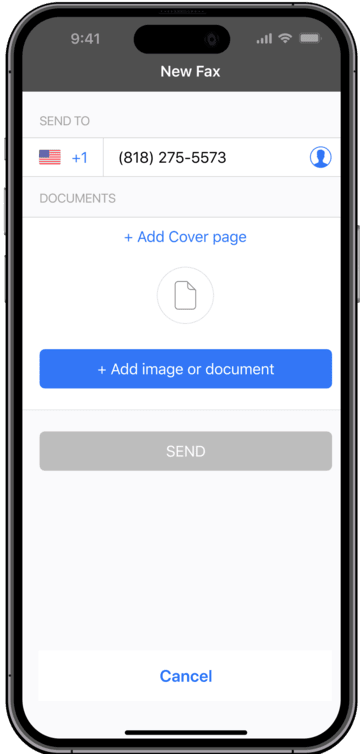
Open to the send screen
The app opens straight onto a new fax, so you’re ready to go in seconds — no hunting through menus. Your inbox, sent history and help all sit a tap away.
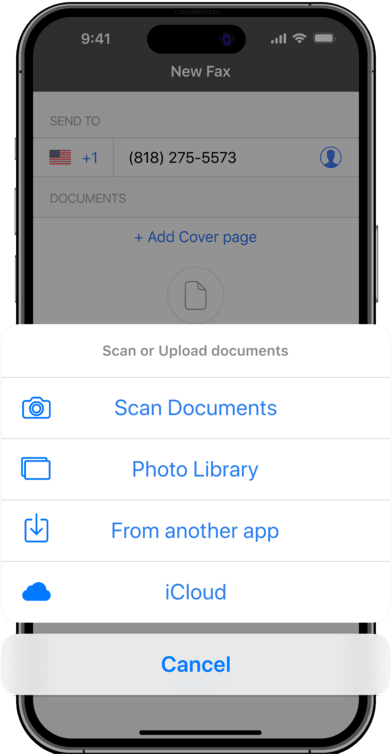
Attach a document, or scan one
Pull in a PDF, image or file from your phone, iCloud, Google Drive or Photos — or use the built-in scanner to turn a paper page into a clean PDF on the spot.
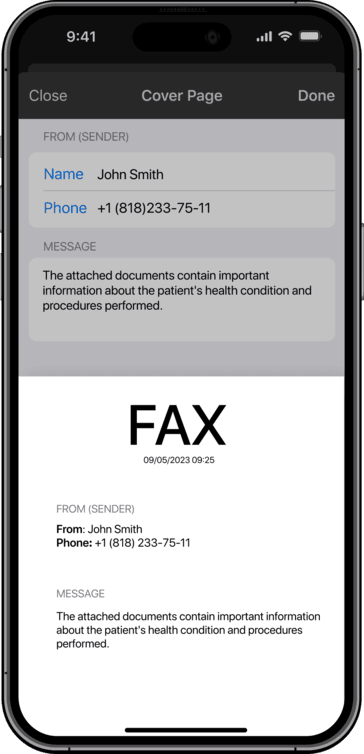
Add a cover sheet (optional)
A short cover sheet says who the fax is for and why it’s arriving. It’s optional, but for medical or official paperwork it’s worth the ten seconds — it keeps things from getting misrouted.
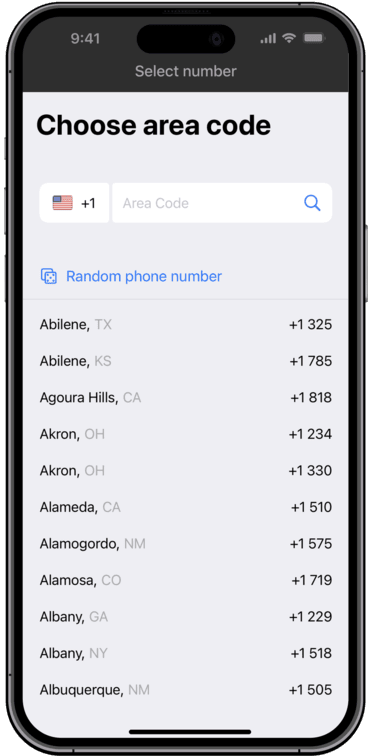
Pick your fax number
Choose a number with a local area code so you look familiar to whoever you’re faxing. The same number receives faxes back, too — so you only need the one.
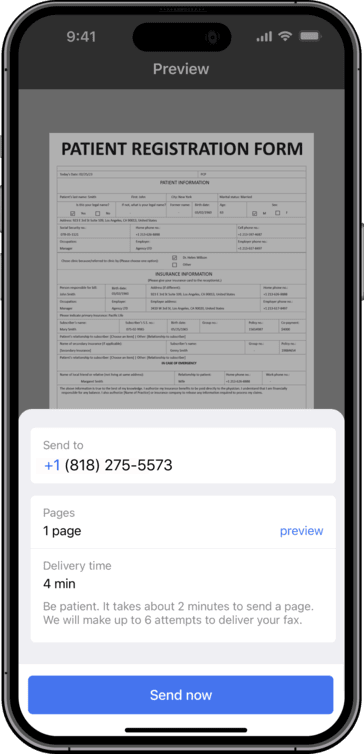
Check it before you send
Give it a quick once-over: page order, the right way up, nothing clipped at the margins. If any of that needs fixing, our page organizer handles it in the browser before you send.
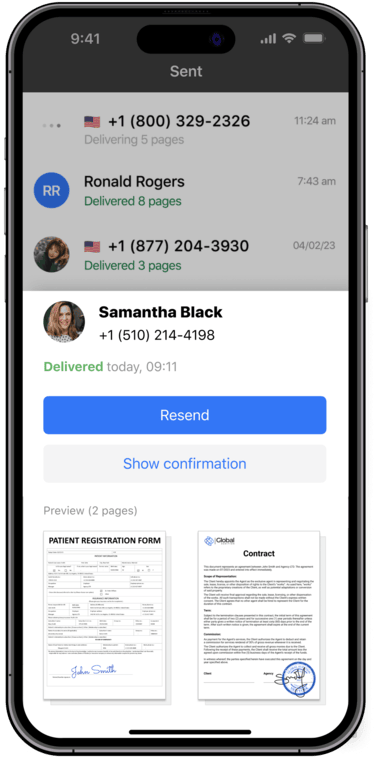
Send and get your receipt
Tap send and the app tracks it in near real time, from pending to delivered. You get a timestamped receipt saved automatically — your proof it actually arrived.
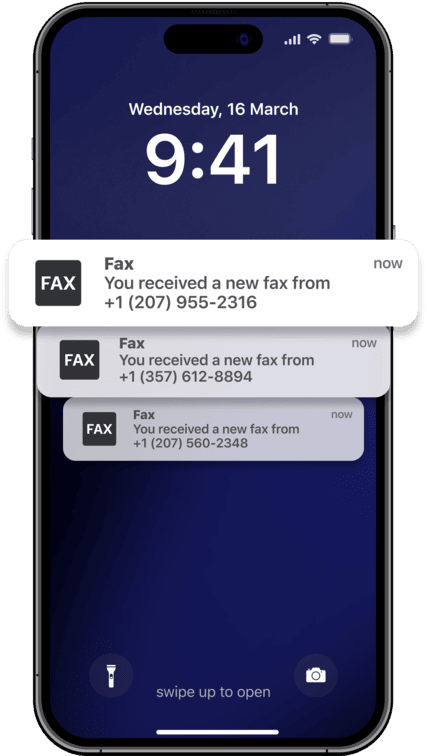
Receiving faxes back
Anything sent to your number lands in your inbox as a PDF, with a notification the moment it arrives. View it, download it, forward it, or save it to the cloud — no phone line needed.
Scan a Paper Page First
Only got the document on paper? Your iPhone already has a scanner built into the Notes app — nothing extra to install. Scan the page to a clean PDF, then send it with any method on this page.
-
Open Notes and tap the camera
Start a new note, tap the camera icon above the keyboard, and choose “Scan Documents.”
-
Capture the page
Hold your phone over the document. It finds the edges and captures on its own, or tap the shutter if you’d rather do it by hand.
-
Add any extra pages
Keep scanning and the pages stack into one document. Tap Save when you’re done.
-
Save it as a PDF
Open the scan, tap Share, then Save to Files and pick iCloud Drive. Now it’s a PDF you can attach.
The scanner inside most fax apps does the same job and adds a little more contrast for faint print, so if you scan often it’s worth using that instead. We go through it in more detail in scan and fax from iPhone.
Prefer Not to Install an App?
An app isn’t the only way. Two routes need nothing installed on your phone:
- From your browser. Open a web fax service like EveryFax in Safari, upload your document, type the number and send. It behaves like an app without taking up space — handy for a one-off, and EveryFax has a free trial so you can test it first.
- From your email. Attach the document to an email and send it to a fax address, and email-to-fax turns it into a fax at the other end. If you can send an email, you can send a fax.
We walk through both, step by step, in faxing from an iPhone without an app, and there’s a dedicated walkthrough for faxing from Gmail if you’d rather work straight from your inbox.
The Three Ways Compared
| Method | App download | Scan a paper page | Receive faxes back | Best for |
|---|---|---|---|---|
| Fax app (on your phone) | Yes | Built-in scanner | Yes, on your own number | Faxing more than once |
| Web service in Safari | No | Scan with Notes first | Yes | A one-off, no install |
| Email-to-fax | No | Attach a scan | Faxes arrive by email | Working from your inbox |
Fax occasionally? Stay in the browser. Fax regularly, or send from paper a lot? The app’s scanner and its saved history earn their keep.
What It Costs
Faxing from your iPhone costs a fraction of a print shop. A FedEx Office or similar counter runs roughly $1–2 for the first page and more for each page after, plus the drive and the queue. Municorn Fax is a flat $9.99/week with unlimited sending, and your first test fax is free, so you can check it goes through before you pay a penny. If you truly only ever need to send one page, a web service with a free trial like EveryFax may suit you better.
Sending medical records? If the document holds protected health information, use a service that is genuinely HIPAA-compliant. Municorn Fax operates under a Business Associate Agreement (BAA) through Compliancy Group, which is what HIPAA actually requires — a free consumer app that only promises “encryption” usually isn’t enough. There’s more in our guide to HIPAA-compliant faxing.
Tips for a Clean Fax From Your iPhone
A few small habits make the difference between a fax that arrives crisp and one that turns up as a grey smudge on the other end.
Send a PDF where you can
PDFs keep their formatting and scale properly on the receiving machine. A photo sent as a JPG can come through skewed or pixelated.
Double-check the number
One wrong digit sends your document to a stranger. Confirm it, add the area code, and include the country code for international faxes.
Mind the contrast
Faxes transmit in black and white, so dark text on a white background reads best. Sharpen anything faint before you send it.
Add a cover sheet for official post
For medical, legal or government faxes, a cover sheet with your details is expected practice — and it keeps your pages from getting misrouted at the other end.
Keep an eye on length
Very long faxes can hit the receiving machine’s paper limits, and every page adds to the transmission time (and, on some services, the cost). If a document is huge, it’s worth splitting it into a couple of sends.
When a Fax Won’t Go Through
Most failed faxes come down to one of four things, and all four are quick to fix.
Wrong or dead number
The usual culprit. Confirm the number with the recipient and make sure the area code is there — and the country code for an international fax.
Busy line
The receiving machine was mid-fax. Use the app’s built-in retry rather than starting a fresh send — it keeps trying without you.
Page sideways
A few older machines won’t reorient a page for you. If a preview shows it rotated, fix it before sending — open the PDF in Files and rotate the page.
Blurry scan
Use good light, hold steady, and let the scanner auto-capture instead of tapping while you move. Wipe the lens, and send a PDF rather than a photo.